参考:
Waifu Diffusion 在线试玩:https://colab.research.google.com/drive/1_8wPN7dJO746QXsFnB09Uq2VGgSRFuYE#scrollTo=1HaCauSq546O
Miniconda:https://docs.conda.io/en/latest/miniconda.html
Torch:https://download.pytorch.org/whl/torch_stable.html
CUDA:https://developer.nvidia.com/cuda-toolkit-archive
waifu-diffusion:https://huggingface.co/hakurei/waifu-diffusion
waifu-diffusion ckpt 文件下载:https://huggingface.co/hakurei/waifu-diffusion-v1-3
stable-diffusion-webui:https://github.com/AUTOMATIC1111/stable-diffusion-webui
免责声明:本文所讲内容仅供学习使用,请勿用于违法用途!请遵从 开源协议 !
温馨提示:
如果需要草梅友仁协助解决问题,请先从博客底部的打赏支付费用,笔者承诺在能力范围内解决问题。
咨询问题 100 元起步;远程连线解决问题 200 元起步。
QQ:2774730186
草梅交流及 BUG 反馈群:807530287
如果不想支付费用的话,请尝试百度/Google ,你遇到的问题一定已经有人遇到过了,大家的时间都是很宝贵的,所以请尝试自己动手解决问题
现在更推荐使用由秋葉 aaaki制作的AI 绘画一键启动器!!!
2022-10-08 更新:发现了个更好用的项目,stable-diffusion-webui ,一键傻瓜式部署,详细教程请参考:2022-10-08 本地部署 stable-diffusion-webui 并替换模型为 waifu-diffusion(没有 NSFW 问题)
Python 的版本问题参考本文的 Miniconda 部分即可,也建议使用 Miniconda 管理 Python 环境,这样可以多版本的 Python 共存。
默认模型是 stable-diffusion,不够二次元,可以从 waifu-diffusion-v1-3 下载 ckpt 文件,覆盖掉默认的模型即可(模型位于 models\Stable-diffusion\model.ckpt),其他不用改,重启即可。
ckpt 文件怎么选,选最近更新的,然后名字中带有 float16 的优先。当然也可以试试别的,自行尝试即可
最近发现了个 AI 生成图片的工具 Waifu Diffusion,还挺好玩的,可以按描述自动生成图片。但在实际使用中,在线版本会频繁的报 NSFW 问题,无法愉快的玩耍,因此本地部署了一个版本,并且通过修改源码的方式绕过了 NSFW 检测,特此记录一下过程。
开始
要顺利运行 Waifu Diffusion,需要足够大的显存(不是内存),笔者使用的电脑配置如下:
型号:联想拯救者R9000P
CPU:R7-5800H 8核
内存:16GB
显卡:RTX3060 Laptop(显存 6GB)
硬盘:512GB SSD
实际上内存和 CPU 之类的不是关键,也用不到那么高配置,跑 AI 费的是显卡,所以显存不够大的就不要尝试了,容易炸显存。
笔者的 6G 显存也只能一次生成一张图,两张图就要炸显存,如果显存更多的可以自行调高生成数量。
【另外,不建议像笔者一样使用笔记本跑 AI,性能释放还是不足,有条件的用台式机更好】
下面开始正式进入教程
准备工作
要安装的软件如下:
- Miniconda,用于管理 Python 环境。
- Python ,具体版本在后续环境会详细说明,此处按下不表,无需提前安装,后面会讲述如何选择版本。
- CUDA,CUDA 的版本由显卡决定,后续会讲述如何选择 CUDA 版本
- Torch,运行 Waifu Diffusion 需要用到 CUDA 版本的 Torch ,默认安装的是 CPU 版本,需要手动安装。Torch 的版本由 CUDA 和 Python 决定。
开始安装
1.安装 Miniconda
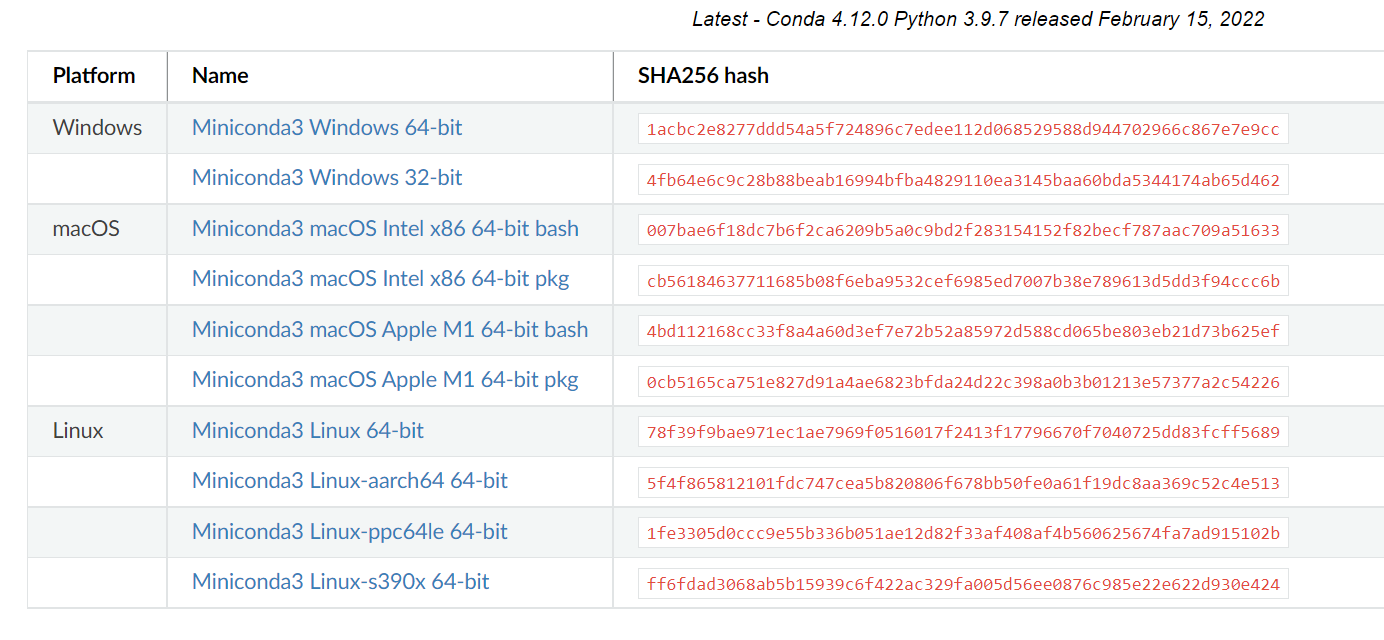
进入Miniconda 官网,选择适用于自己的操作系统的版本,下载安装即可,全部图形化操作。
安装成功后在命令行执行
conda -V成功跳出版本即为安装成功。
conda 4.12.0这里不用着急创建 Python 环境,后续会讲述要创建哪个版本的 Python 环境
接下来配置镜像环境,加快安装速度。(参考:https://mirrors.tuna.tsinghua.edu.cn/help/anaconda/ )
先执行 conda config --set show_channel_urls yes 生成 .condarc 文件
然后在 C:\Users\XXX下修改文件内容如下:
channels:
  - defaults
show_channel_urls: true
default_channels:
  - https://mirrors.tuna.tsinghua.edu.cn/anaconda/pkgs/main
  - https://mirrors.tuna.tsinghua.edu.cn/anaconda/pkgs/r
  - https://mirrors.tuna.tsinghua.edu.cn/anaconda/pkgs/msys2
custom_channels:
  conda-forge: https://mirrors.tuna.tsinghua.edu.cn/anaconda/cloud
  msys2: https://mirrors.tuna.tsinghua.edu.cn/anaconda/cloud
  bioconda: https://mirrors.tuna.tsinghua.edu.cn/anaconda/cloud
  menpo: https://mirrors.tuna.tsinghua.edu.cn/anaconda/cloud
  pytorch: https://mirrors.tuna.tsinghua.edu.cn/anaconda/cloud
  pytorch-lts: https://mirrors.tuna.tsinghua.edu.cn/anaconda/cloud
  simpleitk: https://mirrors.tuna.tsinghua.edu.cn/anaconda/cloud
再运行 conda clean -i 清除索引缓存,保证用的是镜像站提供的索引。
2. 安装 CUDA
在安装 CUDA 之前,先在命令行执行
nvidia-smi会跳出如下结果,只要看 CUDA Version一项即可,记住这个版本号,之后就下载这个版本即可。
比如说笔者这里就是 11.6版本,下载的 CUDA 也是这个版本就行了。
接下来前往 CUDA 的官网,下载对应版本即可。
CUDA 的版本很多,请一定要下对版本,建议就下载nvidia-smi查询出来的结果。
另外多说一句,CUDA 的体积很大,建议安装在 C 盘之外的硬盘,免得占用宝贵的 C 盘空间。
在版本的选择上,操作系统版本就不用多说了,选择自己的系统就行,win10 就选 10,win11 就选 11。
至于下面的 Installer Type,用 local 版本比较省事,下载一次就是完整的安装包了,用 network 版本依旧是要联网下载的,结果也没差太多。
3.选择 Torch 版本
点击https://download.pytorch.org/whl/torch_stable.html ,选择适用于自己操作系统的 Torch 版本。
注意,这里一定要选择带有 cu 前缀的版本!该版本才支持 CUDA!
至于具体的版本号怎么选,首先搜索之前安装的 CUDA 对应的版本,例如笔者之前安装的 CUDA 是 11.6版本,那么这里就搜 cu116。
cu116 下面依旧有很多版本,接下来选择较新版本的 Torch,比如说 1.12.1,很幸运,这里有支持 win64 版本的。
但是在支持的 Python 版本中,这里又有 Python 3.7 到 Python 3.10 的几个版本,Python 的版本选择取决于你自己安装的版本,如果是用 Miniconda 的,那么恭喜你,不用管 Python 版本了,随便选一个就行,笔者选择了 Python 3.9 版本,所以最终选择的版本是 https://download.pytorch.org/whl/cu116/torch-1.12.1%2Bcu116-cp39-cp39-win_amd64.whl【请注意这个链接不要照抄,按自己的情况选择!】
然后先记下这里链接,放一边,后面安装依赖的时候再用。
4.创建 Python 环境
在前面的选择 Torch 版本中,笔者选择了 Python 3.9 版本的 Torch ,所以这里就创建 Python 3.9 版本的环境,选择其他版本的同理。
# 因为本项目是教 waifu diffusion 的,所以就直接叫 waifu_diffusion 了
conda create --name waifu_diffusion python=3.9
# 激活环境,注意,在要运行的地方激活,这个环境切换不是全局的。
conda activate waifu_diffusion
创建环境的这一步有概率遇到 SSL 问题,可能跟 openssl 的版本有关,该问题请自行搜索解决
配置 pip 镜像加速(参考:https://mirrors.tuna.tsinghua.edu.cn/help/pypi/ )
升级 pip 到最新的版本 (>=10.0.0) 后进行配置:
python -m pip install --upgrade pip
pip config set global.index-url https://pypi.tuna.tsinghua.edu.cn/simple
如果您到 pip 默认源的网络连接较差,临时使用本镜像站来升级 pip:
python -m pip install -i https://pypi.tuna.tsinghua.edu.cn/simple --upgrade pippip 这一步有概率遇到 https 无法访问的问题,可能跟 openssl 的版本有关,该问题请自行搜索解决。
这时我们就有了一个 Python 3.9 的纯净环境了,下面开始具体的依赖安装。
5.安装依赖
执行以下命令
# 如果没有切换到 waifu_diffusion 环境记得切换
conda activate waifu_diffusion

pip install transformers gradio scipy ftfy "ipywidgets>=7,<8" datasets diffusers
依赖的内容会很多,慢慢下载即可。
然后再执行
# 注意,这里要下载的是之前记下来的 torch 版本,请勿照抄!
pip install https://download.pytorch.org/whl/cu116/torch-1.12.1%2Bcu116-cp39-cp39-win_amd64.whl
写一个 test.py 脚本进行测试
import torch
print(torch.__version__)
print(torch.cuda.is_available())
# 运行 test.py
python test.py如果跳出来的结果和下面的类似,那么就是安装成功了【下面那个值一定要是 True】。
1.12.1+cu116
True
到这一步,可以说成功了 99%,但别高兴的太早,还差最后一步,正式运行,没有成功运行前,都还不算成功。
正式运行
本次使用的脚本如下:
# -*- coding: utf-8 -*-
# main.py
# 参考自 https://colab.research.google.com/drive/1_8wPN7dJO746QXsFnB09Uq2VGgSRFuYE#scrollTo=1HaCauSq546O

"""waifu-diffusion.ipynb

Automatically generated by Colaboratory.

Original file is located at
    https://colab.research.google.com/drive/1_8wPN7dJO746QXsFnB09Uq2VGgSRFuYE
"""

import gradio as gr
import torch
from torch import autocast
from diffusers import StableDiffusionPipeline

torch.cuda.empty_cache()

model_id = "hakurei/waifu-diffusion"
device = "cuda"

pipe = StableDiffusionPipeline.from_pretrained(model_id, torch_dtype=torch.float16, revision='fp16')
pipe = pipe.to(device)

block = gr.Blocks(css=".container { max-width: 800px; margin: auto; }")

num_samples = 1 # 此处设置一次生成几张图片,原作者设置了2张,笔者修改为1张,可根据自己的显存配置调整

def infer(prompt):
    with autocast(device):
        images = pipe([prompt] * num_samples, guidance_scale=7.5, width = 512, height = 512,step=100)["sample"]

    return images

with block as demo:
    gr.Markdown("<h1><center>Waifu Diffusion</center></h1>")
    gr.Markdown(
        "waifu-diffusion is a latent text-to-image diffusion model that has been conditioned on high-quality anime images through fine-tuning."
    )
    with gr.Group():
        with gr.Box():
            with gr.Row().style(mobile_collapse=False, equal_height=True):

                text = gr.Textbox(
                    label="Enter your prompt", show_label=False, max_lines=1
                ).style(
                    border=(True, False, True, True),
                    rounded=(True, False, False, True),
                    container=False,
                )
                btn = gr.Button("Run").style(
                    margin=False,
                    rounded=(False, True, True, False),
                )

        gallery = gr.Gallery(label="Generated images", show_label=False).style(
            grid=[2], height="auto"
        )
        text.submit(infer, inputs=[text], outputs=gallery)
        btn.click(infer, inputs=[text], outputs=gallery)

    gr.Markdown(
        """___
   <p style='text-align: center'>
   Created by https://huggingface.co/hakurei
   <br/>
   </p>"""
    )

demo.launch(debug=True)
将代码内容复制到 main.py 文件中,运行
# 如果没有切换到 waifu_diffusion 环境记得切换
conda activate waifu_diffusion

python main.py
运行起来后先会安装 waifu-diffusion 模型,体积较大(几个 G),需等待一段时间。
注意:如果可以正常访问 huggingface.co ,请不要挂任何代理,关闭代理后进行下载,否则有可能遇到无法下载模型的问题!
如果无法正常访问 huggingface.co,请尝试将代理设置为全局(此方法未经验证,请自行测试)
然后会跳出一个链接,复制到浏览器访问即可(默认是 http://127.0.0.1:7860 )。
然后就在输入框里面写你想要生成的图片即可,相信各位的英语水平一定比笔者要高,在此就不赘述了。
解决 NSFW 问题
相信能够一步一步看下来的读者朋友一定是为了同一个目的而来的:解决 NSFW 问题。
仔细想想,如果费力那么大劲在本地安装,结果还是 NSFW ,那么还不如去玩线上的版本呢,还省点力气。
接下来,就来讲述如何通过修改源码来解决 解决 NSFW 问题。
首先,要找到安装的依赖在哪里。
先前我们是通过 conda 创建的 Python 环境,依赖也安装在该环境下,以笔者创建的 waifu_diffusion 环境为例,由于笔者的 Miniconda 安装在 D:\ProgramFiles\miniconda3,
所以 waifu_diffusion 就在 D:\ProgramFiles\miniconda3\envs\waifu_diffusion
而最终,我们要找的依赖就安装在 D:\ProgramFiles\miniconda3\envs\waifu_diffusion\Lib\site-packages\diffusers(diffusers这个包)
修改 diffusers包中 pipelines\stable_diffusion\safety_checker.py文件(看名字就知道是用来安全性校验的)
修改文件内容如下:
import numpy as np
import torch
import torch.nn as nn

from transformers import CLIPConfig, CLIPVisionModel, PreTrainedModel

from ...utils import logging

logger = logging.get_logger(__name__)

def cosine_distance(image_embeds, text_embeds):
    normalized_image_embeds = nn.functional.normalize(image_embeds)
    normalized_text_embeds = nn.functional.normalize(text_embeds)
    return torch.mm(normalized_image_embeds, normalized_text_embeds.t())

class StableDiffusionSafetyChecker(PreTrainedModel):
    config_class = CLIPConfig

    def __init__(self, config: CLIPConfig):
        super().__init__(config)

        self.vision_model = CLIPVisionModel(config.vision_config)
        self.visual_projection = nn.Linear(config.vision_config.hidden_size, config.projection_dim, bias=False)

        self.concept_embeds = nn.Parameter(torch.ones(17, config.projection_dim), requires_grad=False)
        self.special_care_embeds = nn.Parameter(torch.ones(3, config.projection_dim), requires_grad=False)

        self.register_buffer("concept_embeds_weights", torch.ones(17))
        self.register_buffer("special_care_embeds_weights", torch.ones(3))

    @torch.no_grad()
    def forward(self, clip_input, images):
        pooled_output = self.vision_model(clip_input)[1]  # pooled_output
        image_embeds = self.visual_projection(pooled_output)

        special_cos_dist = cosine_distance(image_embeds, self.special_care_embeds).cpu().numpy()
        cos_dist = cosine_distance(image_embeds, self.concept_embeds).cpu().numpy()

        result = []
        batch_size = image_embeds.shape[0]
        for i in range(batch_size):
            result_img = {"special_scores": {}, "special_care": [], "concept_scores": {}, "bad_concepts": []}

            # increase this value to create a stronger `nfsw` filter
            # at the cost of increasing the possibility of filtering benign images
            adjustment = 0.0

            for concet_idx in range(len(special_cos_dist[0])):
                concept_cos = special_cos_dist[i][concet_idx]
                concept_threshold = self.special_care_embeds_weights[concet_idx].item()
                result_img["special_scores"][concet_idx] = round(concept_cos - concept_threshold + adjustment, 3)
                if result_img["special_scores"][concet_idx] > 0:
                    result_img["special_care"].append({concet_idx, result_img["special_scores"][concet_idx]})
                    adjustment = 0.01

            for concet_idx in range(len(cos_dist[0])):
                concept_cos = cos_dist[i][concet_idx]
                concept_threshold = self.concept_embeds_weights[concet_idx].item()
                result_img["concept_scores"][concet_idx] = round(concept_cos - concept_threshold + adjustment, 3)
                if result_img["concept_scores"][concet_idx] > 0:
                    result_img["bad_concepts"].append(concet_idx)

            result.append(result_img)

        has_nsfw_concepts = [] # 将 has_nsfw_concepts 设置为空数组,后面就不会报 NSFW 了。 [len(res["bad_concepts"]) > 0 for res in result]

        for idx, has_nsfw_concept in enumerate(has_nsfw_concepts):
            if has_nsfw_concept:
                images[idx] = np.zeros(images[idx].shape)  # black image

        if any(has_nsfw_concepts): # 这里永远为 False
            logger.warning(
                "Potential NSFW content was detected in one or more images. A black image will be returned instead."
                " Try again with a different prompt and/or seed."
            )

        return images, has_nsfw_concepts

    @torch.inference_mode()
    def forward_onnx(self, clip_input: torch.FloatTensor, images: torch.FloatTensor):
        pooled_output = self.vision_model(clip_input)[1]  # pooled_output
        image_embeds = self.visual_projection(pooled_output)

        special_cos_dist = cosine_distance(image_embeds, self.special_care_embeds)
        cos_dist = cosine_distance(image_embeds, self.concept_embeds)

        # increase this value to create a stronger `nsfw` filter
        # at the cost of increasing the possibility of filtering benign images
        adjustment = 0.0

        special_scores = special_cos_dist - self.special_care_embeds_weights + adjustment
        # special_scores = special_scores.round(decimals=3)
        special_care = torch.any(special_scores > 0, dim=1)
        special_adjustment = special_care * 0.01
        special_adjustment = special_adjustment.unsqueeze(1).expand(-1, cos_dist.shape[1])

        concept_scores = (cos_dist - self.concept_embeds_weights) + special_adjustment
        # concept_scores = concept_scores.round(decimals=3)
        has_nsfw_concepts = torch.any(concept_scores > 0, dim=1)

        # images[has_nsfw_concepts] = 0.0  # black image # 这里是设置为 黑图片,也注释掉了

        return images, has_nsfw_concepts
在此运行 python main.py,输入 prompt 之后生成图片,就不会报 NSFW 了
最后
那么最后还有一个问题,要怎么写 prompt 呢?
答案是参考别人写的,需要点科学上网的手段,自行前往推特上 Waifu Diffusion 相关话题下查看即可,点击 ALT,看下别人是怎么写的就行了。
不过这里要注意下,由于 AI 跑的结果多少有点随机,未必能跑出来类似的结果,如果差距较大也属正常,多试几次就行。
完成以上步骤之后,相信你也能愉快的玩耍 Waifu Diffusion 了。
喜欢的话就请支持下笔者。
PS:最后的最后,说一个冷知识,连文档都没说明的事情,那就是下载在本地的模型到底在哪,经过一番研究,模型的地址位于:
C:\Users\XXXX\.cache\huggingface\diffusers下(XXX 为 用户名),可以自己看下模型到底有多大。
- 本文链接: https://wp.cmyr.ltd/archives/run-waifu-diffusion-locally-and-solve-the-nsfw-problem
- 版权声明: 本博客所有文章除特别声明外,均采用 BY-NC-SA 许可协议。转载请注明出处!
欢迎关注我的其它发布渠道


发表回复
要发表评论,您必须先登录。